The Allotment Year
The Allotment Year
This page has been created following ideas expressed regarding an allotment diary, some of which would act as an aide memoire for what should be done at a given point in time, but also as a point of reference perhaps for other association members.
It was also felt that newer members or plotholders, that may not have the experience of those of us that are 'serial allotmenteers' may find information and resources here that may prove invaluable and turn what is a daunting proposition of cultivating an initial empty plot of land into something that is both productive and rewarding.
The Melbourne Park Allotment diary or year starts with November. The documents are written and saved as a series of PDF files, which can easily be downloaded and printed. These documents are written purely as a guide, and we would welcome any additional contributions, notes or items to compliment these ideas.
The Allotment Year 2 November
The Allotment Year December
The Allotment Year January
The Allotment Year February
The Allotment Year March
The Allotment Year April
The Allotment Year May
The Allotment Year June
The Allotment Year July
The Allotment Year August
The Allotment Year September
The Allotment Year October
The first brief article has been on the site for some time, and deals with managing your plot. This is followed by a small item on Confrey Fertiliser, which probably fits into one of the summer months, and to start the ball rolling the Month of November starts the Allotment Year article off. We have decided to attach the diary as a series of PDF documents that can easily be downloaded and printed if necessary, besides the fact that the initial document is easier to amend should we receive input, ideas, advice and guidance that should be added.
Managing Your Plot
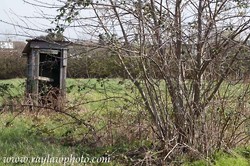
Does your new plot resemble the image on the left - a weed and bramble infested jungle, with overgrown shrubs and other unsavoury growth. Don't worry, most new plots are! Trying to clear it all, in one super human effort, can be pretty demoralising - better to clear a manageable 'bit' and get that element working really well.
Is there a best time to start? Probably Autumn or early Winter - give yourself plenty of time to clear and prepare beds for the new growing season, and you'll then have the time in spring to invest in sowing and tending your crops. If you start in spring, it's a bit harder to juggle the time you need to do both tasks well.
Mark your plot out into beds - 4 foot wide by any suitable length; the idea being that you don't walk on your growing soil, but can easily reach everything in the bed from the path.
Decision time! Do you want to grow organically? If so, clearing is probably a digging job; lift as much of the weed cover as you can, and use it to start a compost heap; use the fork and your hands to remove as much of the weed root systems as you can. An alternative is a rotovator, but beware, it will chop every weed into hundreds of little pieces, each of which can become a new weed! (So dispiriting!) Another alternative is to try a light proof covering of mulch. Weed-killer - again take it easy; don't overdo it, or be over ambitious. It's better to clear a small bed really well, and have good crops from it; cover the unused part of your plot and come back to clearing it later in the season.
Start your compost heap! Make it as simple or complicated as you wish, but do get one going - it's good for maintaining fertile and healthy soil. Look at the plots around you - plots with compost heaps are usually the ones with good deep beds bulging over the path edges; plots without compost heaps are often those where the soil has sunk below the level of the path.
Finally the compost heap is an essential of the plot - almost all of your garden waste (except horsetail, potatoes, potato plants and brassica roots) should go on. Good compost is an art in itself! For a good nitrogen rich starter, don't go to the garden centre - try human urine (sorry - but true).
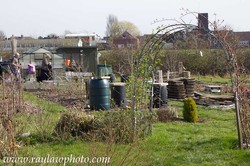
Hopefully having followed these basic tips, you have moved from the jungle at the start of this article, to an area of aesthetic pleasure such as the image on the right.
Comfrey Fertilizer
There are variations on this, and several plot holders distilling their own fertilizer. This specific guide has been provided by Arthur Cornell. For a really professional view of how to distil take a look at Laurie's ingenuity which includes piping, funnells, concrete blocks and pipework at the base to catch the fermented product. So good, it's almost an industrially engineered process.
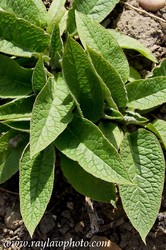
Cut leaves when Comfrey plant is about 60cm high, cutting about 5cm from the ground. (The image on the left shows a young Comfrey plant). Stuff leaves into containers, anything from a water barrel with hole in the bottom to an inverted plastic drinks bottle with top and bottom removed.
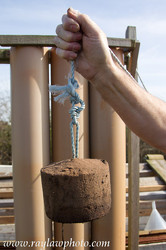
Place jar underneath to catch dark liquid which will drip from container after approximately two to three weeks. (Image right shows Laurie concrete weight - press - with the ingenious pipework behind). Dilute the liquid at rate of one part comfrey to 10-20 parts water. If liquid is thick and black use 20 parts water. If thin and brown use only 10-15 parts water.
This page has been created following ideas expressed regarding an allotment diary, some of which would act as an aide memoire for what should be done at a given point in time, but also as a point of reference perhaps for other association members.
It was also felt that newer members or plotholders, that may not have the experience of those of us that are 'serial allotmenteers' may find information and resources here that may prove invaluable and turn what is a daunting proposition of cultivating an initial empty plot of land into something that is both productive and rewarding.
The Melbourne Park Allotment diary or year starts with November. The documents are written and saved as a series of PDF files, which can easily be downloaded and printed. These documents are written purely as a guide, and we would welcome any additional contributions, notes or items to compliment these ideas.
The Allotment Year 2 November
The Allotment Year December
The Allotment Year January
The Allotment Year February
The Allotment Year March
The Allotment Year April
The Allotment Year May
The Allotment Year June
The Allotment Year July
The Allotment Year August
The Allotment Year September
The Allotment Year October
The first brief article has been on the site for some time, and deals with managing your plot. This is followed by a small item on Confrey Fertiliser, which probably fits into one of the summer months, and to start the ball rolling the Month of November starts the Allotment Year article off. We have decided to attach the diary as a series of PDF documents that can easily be downloaded and printed if necessary, besides the fact that the initial document is easier to amend should we receive input, ideas, advice and guidance that should be added.
Managing Your Plot
Does your new plot resemble the image on the left - a weed and bramble infested jungle, with overgrown shrubs and other unsavoury growth. Don't worry, most new plots are! Trying to clear it all, in one super human effort, can be pretty demoralising - better to clear a manageable 'bit' and get that element working really well.
Is there a best time to start? Probably Autumn or early Winter - give yourself plenty of time to clear and prepare beds for the new growing season, and you'll then have the time in spring to invest in sowing and tending your crops. If you start in spring, it's a bit harder to juggle the time you need to do both tasks well.
Mark your plot out into beds - 4 foot wide by any suitable length; the idea being that you don't walk on your growing soil, but can easily reach everything in the bed from the path.
Decision time! Do you want to grow organically? If so, clearing is probably a digging job; lift as much of the weed cover as you can, and use it to start a compost heap; use the fork and your hands to remove as much of the weed root systems as you can. An alternative is a rotovator, but beware, it will chop every weed into hundreds of little pieces, each of which can become a new weed! (So dispiriting!) Another alternative is to try a light proof covering of mulch. Weed-killer - again take it easy; don't overdo it, or be over ambitious. It's better to clear a small bed really well, and have good crops from it; cover the unused part of your plot and come back to clearing it later in the season.
Start your compost heap! Make it as simple or complicated as you wish, but do get one going - it's good for maintaining fertile and healthy soil. Look at the plots around you - plots with compost heaps are usually the ones with good deep beds bulging over the path edges; plots without compost heaps are often those where the soil has sunk below the level of the path.
Finally the compost heap is an essential of the plot - almost all of your garden waste (except horsetail, potatoes, potato plants and brassica roots) should go on. Good compost is an art in itself! For a good nitrogen rich starter, don't go to the garden centre - try human urine (sorry - but true).
Hopefully having followed these basic tips, you have moved from the jungle at the start of this article, to an area of aesthetic pleasure such as the image on the right.
Comfrey Fertilizer
There are variations on this, and several plot holders distilling their own fertilizer. This specific guide has been provided by Arthur Cornell. For a really professional view of how to distil take a look at Laurie's ingenuity which includes piping, funnells, concrete blocks and pipework at the base to catch the fermented product. So good, it's almost an industrially engineered process.
Cut leaves when Comfrey plant is about 60cm high, cutting about 5cm from the ground. (The image on the left shows a young Comfrey plant). Stuff leaves into containers, anything from a water barrel with hole in the bottom to an inverted plastic drinks bottle with top and bottom removed.
Place jar underneath to catch dark liquid which will drip from container after approximately two to three weeks. (Image right shows Laurie concrete weight - press - with the ingenious pipework behind). Dilute the liquid at rate of one part comfrey to 10-20 parts water. If liquid is thick and black use 20 parts water. If thin and brown use only 10-15 parts water.